
Overview
Microsoft's Remote Desktop functionality is built right into Windows, and allows a secondary computer's desktop to be shown in a window right on your local desktop. This window can be maximized to take up an entire display, at which point it looks like a regular desktop.
In other words, if your primary computer has multiple monitors, you can easily dedicate one to a full-screen remote desktop session and it will look like this:

Close up, a typical remote desktop session looks like a normal desktop, with the addition of a small connection status bar at the top:

After following the instructions on this page, you will be able to use Remote Desktop to seamlessly interact with one or more "Remote" computers all from your primary computer. You can then run SteadyMouse on your primary computer and it will work fine as you interact with the remote computer(s) over Remote Desktop.
Remote Computer Setup
The remote computer should be the "less physically accessible" one. Perhaps it doesn't even have a monitor connected. It can literally be in a "Remote" location as long as it's still on your network, hence the name.
In order to use a computer remotely, we need to do a little bit of setup on it first. Login to this soon-to-be remote computer and we'll walk through the necessary changes:
- From the Start Menu, notice the User Name. It's necessary to know this later because Remote Desktop requires you to log-in.

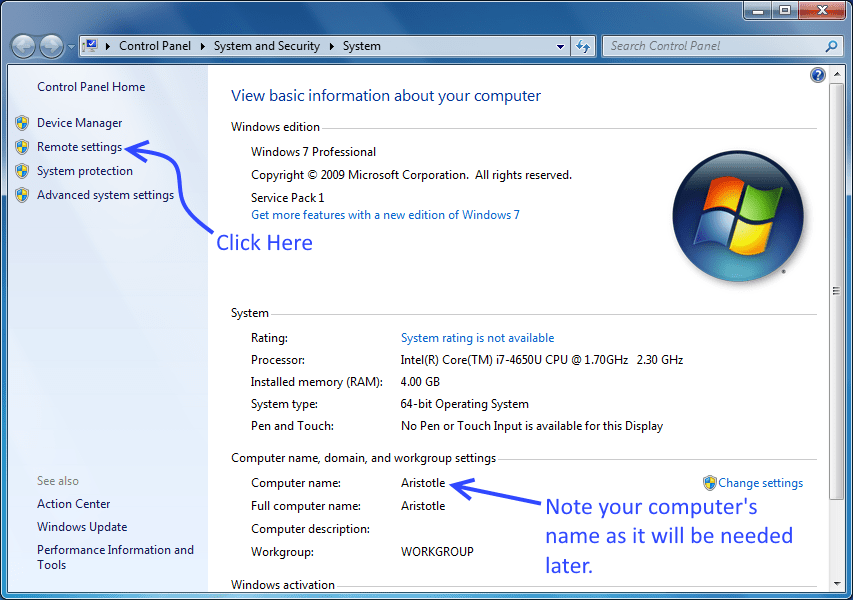
- Next, right click "Computer" and then click "Properties" from the menu that appears.

- Make note of the computer's name. We'll need this later to tell Remote Desktop what computer we wish to connect to. Then click "Remote Settings"

- Click Yes, if a popup asks "Do you want the following program to make changes to this computer?"
- Select the "Allow connections..." option pointed to by the arrow. This allows Remote Desktop to be used. Then click "Select Users"

- Click "Add"

- Here we tell Windows what users are allowed to use Remote Desktop. Enter the user name you noted in the first step. Then click OK

- Now you should see your user name. This will be the one you login with later from your primary computer. Click "OK" to finish.

- Click OK once more and close out of all the windows we opened.
- This computer should now be ready to be used remotely.
- Proceed to Local Computer Setup for instructions to get your primary computer to connect to this remote PC.
Local Computer Setup
In this section we will make a simple desktop icon that you can double click to initiate a "Remote Desktop" session into a remote computer.
- From the Start Menu search "Remote Desktop". Then click on "Remote Desktop Connection" once it appears.

- Once the "Remote Desktop Connection" application has started, click "Show Options"

- Here we will enter various settings to make the remote desktop experience nice and smooth.

- First enter the computer name and user name of the computer you wish to connect to. These should match what you had in the "Remote Computer Setup" section from earlier.

- Click the "Display" tab and set the Display size to full screen. Also make sure "High Quality" is selected.

- Click the "Experience" tab and make sure "LAN (10Mbps or higher)" is selected.

- Return to the general tab and select "Save As"

- Navigate to the Desktop and then name the file after the computer it will remotely connect to. Then click "Save"

- You should now have a nice icon on your desktop that can be used to remotely connect to the more distant computer! Double click it!

- The first time it tries to connect you may get a warning. Check the box and then click "connect".

- You will be prompted to login. Once credentials are entered, click OK.

- Finally, one more warning may appear. If it does you can just check the box and click "Yes"

- Now the fun part! You should see the desktop of the remote computer, all in a full screen window!

- If you wish to move it to another monitor, just drag the bar at the top of the screen.

- Additionally you can minimize or close this remote desktop window just like a normal one.
- FYI, closing the remote desktop window (by clicking the 'X' on the bar) simply suspends the session on the remote computer. Next time you "remote in" it will pickup right where you left it.
- Copy and paste should work when you go between the remote desktop window and your local computer.
- From here on, anytime you wish to remotely connect to the secondary computer just double click the icon you made.
- Run SteadyMouse from your local computer (ie: The one with the mouse physically connected) and the filtering and click-ignore capability will automatically work.
