
SteadyMouse 2 User Manual
Updated January 2026
- 1 Website Translation

- 2 User Community
- 3 Multiple Computers
- 4 Minimum Requirements
- 5 Compatible Mouse Types
- 6 Purchase
- 7 Download
- 8 Installation
- 9 Product Activation - Simple
- 10 Product Activation - Manual
- 11 Alternate Download Method
- 12 Checking for Updates
- 13Language Selection
- 14First Time Running
- 15General Configuration
- 16System Tray
- 17 Opening Settings
- 18 System Toggle Key (ie: On / Off)
- 19 Anti-Tremor Filtering
- 20 Filter Sets
- 21 Filter Tuning
- 22 Ignore Accidental Clicks
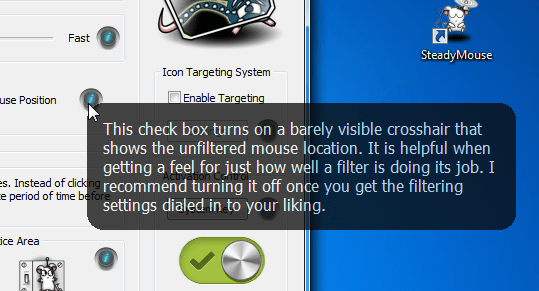
- 23 Icon Targeting System
- 24 Wacom Tablet Support (Experimental)
- 25 Cinematic Camera Stabilization
- 26 Normal Quit
- 27Gaming
- 28Visual Effects
- 29Troubleshooting
- 30Force Quit
- 31How Versioning Works
- 32Changing License Types
- 33Changing Product Keys
- 34Removal
- 35Easy Refunds
Website Translation

To translate this website from English into your local language, use the control in the upper-right corner of the page.
User Community

At times it is nice to connect with other users and share ideas, bugs, annoyances, likes, dislikes, etc.
The Reddit forum /r/steadymouse
has been created as a place for SteadyMouse users to discuss anything they wish regarding the software. The problems it solves, and ones
they wish it would solve, criticism, feedback, etc. is all fair game. Please feel welcome to create a new post or join an existing one.

The hope is we will be able to make a small community and the voting there can be useful in showing how
important a topic is to everyone. This way, you can influence the direction the software takes next in
cooperation with others in the community. We can refine ideas together.
Multiple Computers
Your SteadyMouse purchase comes with the freedom to install and activate the software on all of your
personal computers for personal use (within reasonable limits). In other words, it's expected that
a user with several devices, such as a desktop computer in their study and a laptop in the living room,
will install SteadyMouse on each of them. This is perfectly fine, as long as it's for the user the license
was intended for.
 The one hard limit is that a given product key will successfully activate up to 30 times
(for each user on the key) and no more beyond that. This number is chosen to be more than enough for a
user to purchase once and be able to install on all their current computers as well as computer
replacements in the years ahead. See the EULA for more details if you like.
The one hard limit is that a given product key will successfully activate up to 30 times
(for each user on the key) and no more beyond that. This number is chosen to be more than enough for a
user to purchase once and be able to install on all their current computers as well as computer
replacements in the years ahead. See the EULA for more details if you like.
NOTE: If purchasing for multiple users, you have the option of buying multiple keys or purchasing
a single key that has multiple users on it. This can be done via the "quantity" field at checkout.
To install on several computers you will simply need the installer and your product key.
One easy way is to access your purchase receipt email on each computer you wish to install on.
Then run through the
Installation and
Activation steps like normal.
Minimum Requirements
SteadyMouse 2 is optimized and elegant under the hood, so that it will run seamlessly on the majority of computers out there with no issues.
 Fully compatible with the following OS versions:
- Windows 11 (x86, x64, ARM64)
- Windows 10
- Windows 8.1
- Windows 8
- Windows 7
- Windows Vista
- Windows XP (SP3)
- Windows Server 2016
- Windows Server 2012
User privileges:
- Admin rights are necessary just to install or upgrade.
- Basic user rights are all that is needed to run SteadyMouse.
Mouse hardware:
- All known types of mice are supported
- You can find a list of tested mouse types here
Future Support (Not ready yet):
- Apple MacOS (and potentially Linux) support is NOT YET available however work is in progress.
- You may sign up here to be notified when it is ready.
- ETA is unknown as this work is extremely difficult.
- If you purchased "SteadyMouse X (All Versions)", you will have access to it when ready.
Compatible Mouse Types
SteadyMouse is designed to transparently work with all common mouse types. Your existing
mouse will almost certainly work right out of the box. It is common for laptop users to
have both a trackpad and a standard wireless mouse, and both will work fine.
Supported mice:
- Wired mouse (USB, PS/2, etc.)
- Wireless mouse (USB, Bluetooth, etc)
- Trackpad
- Roller ball mouse
- Contour RollerMouse
- Pointing stick
- Nintendo Wii Remote
When experimenting, you can connect multiple mice at once and quickly switch between them.
It is also recommended to get an extra large mouse pad, so you have a nice amount of space
and do not find the mouse frequently hitting the edge of the pad.
It is recommended to experiment with different mice until you find which you like best.
Things like the physical weight, optical vs. laser, wired vs wireless, and mouse pad size
all can make a positive difference.
Purchase
If you have not already bought SteadyMouse, you can do so at the purchase page.
Take a glance at the steps below for an overview of what that looks like.
The steps to buy SteadyMouse are as follows:
- First choose the desired license type from the options at the bottom of the purchase page.

- Next select the quantity of licenses you wish to have. Usually this is just one license per
individual that will be using the software. Then click the "Buy This" button when you are ready.

- A form will appear and you will be directed to enter your email and payment information to complete the purchase process.

- Take special care to enter a correct email address so you receive a copy of your purchase receipt.
If the email to you bounces due to a misspelling or typo, it may result in an automatic refund
after a few days.
- After completing the purchase a pop-up will appear containing a View Content button that
you can click to access both your Product Key and the Download Link for the installer.
- A copy of this same information along with your Product Key is sent to your email and should arrive
within ten minutes. Please make sure the email is received. If it does not show up, check your
spam folder. If it is not there either then please contact
support@steadymouse.com
- Your purchase receipt email is helpful anytime you need to download a fresh copy of SteadyMouse. It
is recommended that you keep a copy saved for the future.
- Once you have your purchase receipt email, proceed to the next section to download a copy of
SteadyMouse for the first time.
Tip: Need an invoice for your purchase? Open your purchase receipt email. There is a "Generate"
link at the bottom that will make one for you.
Download
After purchase you should have an email with your SteadyMouse purchase receipt. Open it up and take a look.
This email contains everything needed to get up and running. Downloading and installing the setup
file is pretty typical. You can see an overview of these steps below.
Video Walkthrough
Written Walkthrough With Screenshots
Alright then, let's download SteadyMouse to your computer so we can get it installed! The steps are as follows:
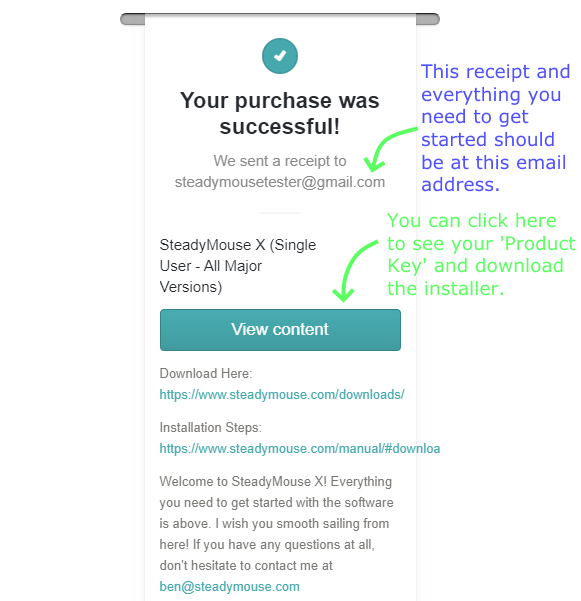
- This is what the purchase receipt email looks like:

- First, notice the View Content button within the email. Clicking this button will take you to a
download page where you can get the SteadyMouse installer for your computer.
- Also within the email, take note of your Product Key as it will be needed later to activate the software.
- When you are ready, click the View Content button.
- A new tab will then open in your browser and the page that loads will have a download button. Click it to begin the download.
- Your browser will show the progress of the download either near the bottom (Chrome), or in the upper right
corner (Firefox). See the blue arrow in the image below for an example of how it normally looks.

If you run into any problems downloading, please try again with another browser such as Chrome or Firefox.
If all else fails, email support@steadymouse.com
and we will make sure you are taken care of. You can also try the alternate download method described
here.
- Once your download of the SteadyMouse setup file completes, simply click on it to run the installation. If you
do not see anything to click on in your browser, check your Downloads Folder and see if the file is there.
The file name starts with "SetupSteadyMouse..."

- If upon running the installer, a security warning appears, click Run.

- Click Yes at the "User Account Control" prompt.

- The installation itself is pretty typical. If you prefer step-by-step instructions, continue to the
next section on installation below.
NOTE: If double-clicking the installer seems to do nothing see the setup troubleshooting page.
Installation
Once you have downloaded a copy of the SteadyMouse setup file (see the previous section),
these steps will help you to install it:
- If you haven't done so already, double click the SetupSteadyMouse file to
begin the installation.
- The installer should begin to run. If nothing seems to happen see here.
- Click "Yes" at the prompt.
- Select your language

- At the welcome screen click the Next button.

- Read over and accept the End User License Agreement

- Check or uncheck the box to select whether you would like SteadyMouse to startup automatically every time your
computer powers up. Then click Next.

- Click Install to confirm your wish to install SteadyMouse

- You will see a progress bar indicating the installation status. This usually takes less than 30 seconds to complete.

- Click Finish to complete the installation.

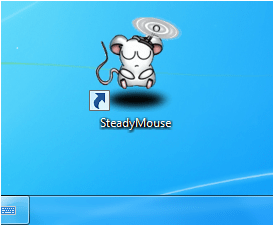
- Once installed, you can launch the SteadyMouse application anytime by double-clicking the desktop icon.
- You are almost there, and just need to use your Product Key to activate now!
Continue to the next section on product activation for these last few steps.
- Tip: Double clicking the desktop icon AFTER SteadyMouse is ALREADY RUNNING will bring up the settings window.
Product Activation - Simple
Activation is a one time thing, per computer, and requires an internet connection just once.
- You should have a Product Key recieved in your email after purchase.
- When you run SteadyMouse the first time, it will ask you to activate. Enter your Product Key in the provided field.

- Optional Step: If you need to go through a proxy server, click "Show Advanced Options" and then enter it.
- Click "Activate" and you will see a progress bar as it performs the one time activation with the server.
If all goes well, you will see this success message:

- All done! You should never have to activate on this computer again unless you intentionally uninstall
the software. Updates that fall under your license are seamless and your activation will
automatically carry over from one update to the next.
Product Activation - Manual
Activation is a one time thing per computer and requires an internet connection just once. Manual Activation is
useful if you wish to get SteadyMouse up and running without having the software talk directly to the activation server.
Everything happens via your default web browser. To activate manually do the following:
- You should have a Product Key recieved in your email after purchase.
- When you run SteadyMouse the first time, it will ask you to activate.
- Enter your Product Key and then click the "Show Advanced Options" check box.

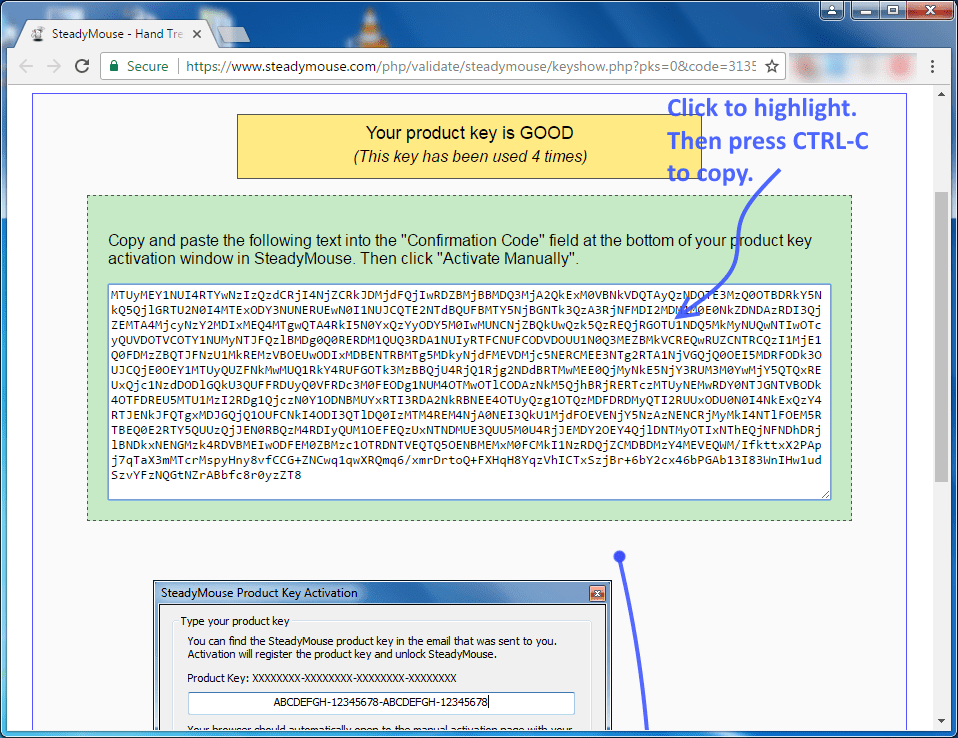
- Click "Get Confirmation Code" and your default web browser will automatically launch.
A page should then load containing your confirmation code. This uses one activation.

- Copy and paste the confirmation code from the webpage into the "Manual Confirmation Code" field.

- Click "Activate Manually" and you should see the success message appear:
- All done! You should never have to activate on this computer again unless you intentionally uninstall
the software. Updates that fall under your license are seamless and your activation will
automatically carry over from one update to the next.
Need to activate without an internet connection? It's a little bit more work. Visit
here
for instructions.
Alternate Download Method
For most users, clicking the View Content button in their purchase receipt email will be
enough to get a copy of the software. For cases where this is not ideal, or not working, there is
an alternate download method provided. You will need your Product Key.
 Follow these steps:
- Visit the downloads page
- Select your License Type
- Enter your Product Key
- Click Submit
- Provided the information entered is valid, you should be directed to the download page.
Checking for Updates
SteadyMouse contains an easy way to check for new updates. Access to new versions is built right into
the application, so all it takes is a few clicks.
Video Walkthrough
Written Walkthrough With Screenshots
- With SteadyMouse already running, double click the desktop icon to bring up the main settings window.
- From the SteadyMouse settings window click the little mouse cartoon in the upper right corner.
This will open the "About Window"

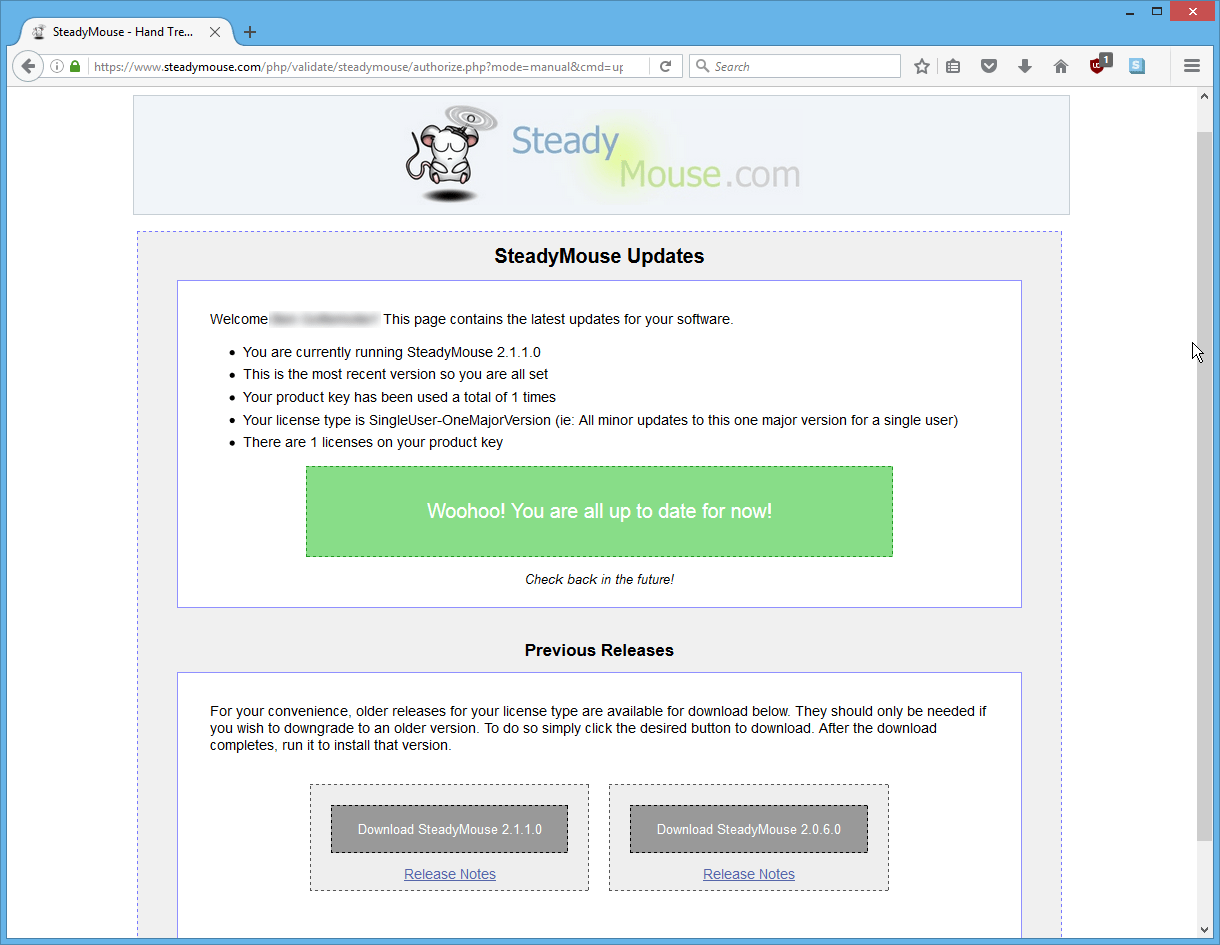
- Once the About Window is open, click the "Check for Updates" button on the right hand side.

- The settings window for the periodic update reminder will appear. Click the Check Now button.

- Your default web browser will automatically open to a page with download options
- If you are already up to date you will see this:

- If a newer version is available you will see this:

- If an update is indeed available, click the big "Download SteadyMouse" button to begin downloading the new installation file.

- After the file is finished downloading, simply click on it to start the installer.

- When the browser security warning appears, click Run.
- Click Yes at the User Account Control prompt.
- Run through the installation steps like normal and you are all set!
- If desired, you can find more detailed instructions regarding the installer steps in the
install section of the manual.
- Your settings and product-activation are automatically preserved from update to update.
Note: An alternative way to "Check for Updates" is available by right clicking the system tray
icon (See the green arrow in the picture below). This icon is found in the lower right corner of your desktop.
A menu will appear and then from there you can click "Check for Updates" (See the blue arrow in the picture).

Language Selection
SteadyMouse 2 comes with language support for English, Brazilian Portuguese, Danish,
Dutch, French, German, Italian, Russian, and Spanish.
- The first time you run SteadyMouse it will ask you to select your language. Choose your
language and select OK.

- You can return to the above window to change the language any time by right clicking
the system tray icon and clicking "Language"

- Linguistic translation work is always ongoing as new text is added to the software for new and upcoming features.
For early access to upcoming language files that are not yet included in an installation, visit the
Translation Status page.
Interested in contributing a translation in your local language? Visit the
Translation Instructions page for details.
First Time Running
The first time you run SteadyMouse it will take you through the welcome sequence (one time only).
- First, you will get a welcome window with a basic overview of features to get you started.

- After this, SteadyMouse may make a few one-time adjustments to Windows mouse settings. This usually
includes turning off "Enhanced Pointer Precision" because it actually degrades precision.
- The SteadyMouse settings window will automatically be opened for you to explore. Try experimenting
with the various controls and clicking the help bubbles to find out what they do!
- Once you close the settings window, you can always return to it by double clicking the desktop icon.
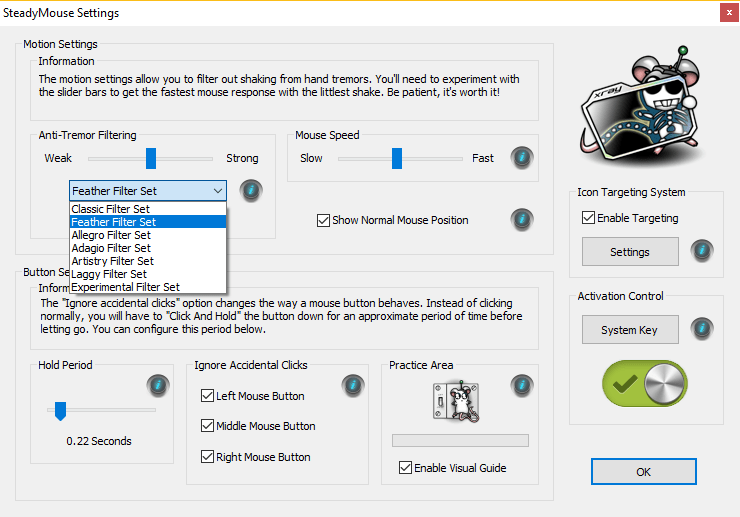
General Configuration
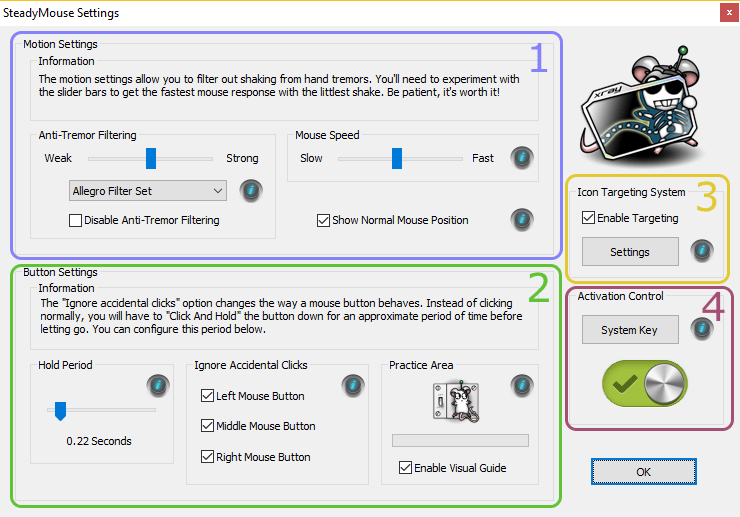
The main settings window in SteadyMouse has all the adjustments you need in one easy to reach place.
- The controls are grouped into several categories that we will focus on one at a time.
 Control Categories:
- "Anti-tremor Filtering" focuses on removal of shaking hand motion from your cursor.
- "Ignore Accidental Clicks" functionality focuses on blocking unintended button clicks from getting through.
- "Icon Targeting" capability focuses on locating the nearest "clickable item" to your cursor and clicking it
for you with the double-tap of a "trigger key".
- "System Toggle Switch" functionality turns all features on and off together, from anywhere.
- Feel free to experiment and get a "hands on" feel for what each feature does! You won't break it!
- You can click the "help bubbles" in each section to get the full details on what each control does.
- If you run into any trouble just toggle SteadyMouse off using the "Num Lock" key (Or whatever
toggle key you have set in category #4).
- Once you are familiar with the basics and ready to go deeper, each of the control categories has its own section
in the manual.
- Opening Settings
- System Toggle Key (On / Off)
- Anti-Tremor Filtering
- Ignore Accidental Clicks
- Icon Targeting System
- After you have things to your liking, click "OK" and the window will disappear and SteadyMouse will run
hidden in the background.
System Tray
When SteadyMouse is running it is accessible via a system tray icon in the lower right corner of the Start Bar. On newer versions of Windows it is
hidden behind a caret symbol. If so, click that first.
- This icon is a small image of a mouse with either a green '+' or a red '-' depicting whether SteadyMouse is toggled on or off.
- Double clicking the icon will bring up the configuration window.
- Right clicking the icon will bring up a menu with various options to change things like language, check for updates, etc (See the image).
- To quit SteadyMouse right click the icon and click "Exit" on the menu.
Opening Settings
After SteadyMouse is already running, just double click the desktop icon to open the settings window.
Additionally, you can open settings by holding down the system "Toggle Key", described in the next section, for several seconds.
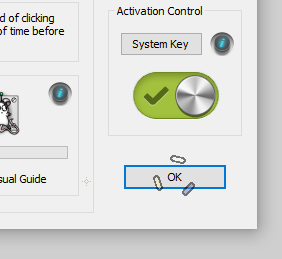
System Toggle Key (On / Off)
All of the features of SteadyMouse can be switched on or off together using a special system-wide "Toggle Key". This hotkey
is especially useful when you want to quickly turn filtering off or back on without opening up the configuration window.
Toggling Between On and Off
- The current toggle key setting is displayed in an information bubble shown every time SteadyMouse starts up.

- Whenever this toggle key is pressed, all of SteadyMouse transitions back and forth between enabled and disabled.
- You will additionally notice several graphical indicators appear to illustrate the change, and of course the mouse will
feel different accordingly.

Toggle Key Shortcut to the Settings Window
- You can use the toggle key to quickly access the settings window.
- Simply press and hold it down for at least 3 seconds, then let go.
- Rather than toggle like normal, the settings window will appear for you.
Changing the Toggle Key(s)
- In the old SteadyMouse v1.3, the only option for the "Toggle Key" was "Scroll-Lock". Scroll lock is nice since it's a
rarely-used key, and often has a light on the keyboard giving you a visual indicator of the status, however many newer
keyboards do not have it.
- With SteadyMouse 2.6.3.0 and later, "Num-Lock" is now the default toggle key. It is also configurable in settings and via a prompt
the first time the software runs. If your keyboard does not have the Num-Lock key please select a different option.
- To change your system-wide toggle key, open the SteadyMouse settings window and click the "On / Off Control" Settings button on the right hand side.
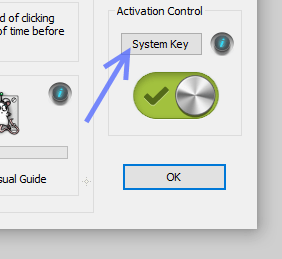
- The System Toggle Settings window contains a drop down list with several alternative toggle key(s). Select the desired key combo and click OK.
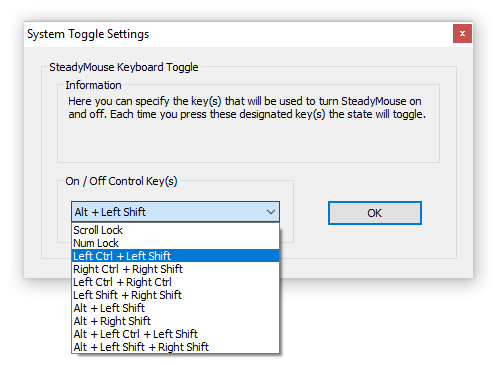
- This key-combo can be pressed anytime, from anywhere, to toggle all of SteadyMouse on and off.
Anti-Tremor Mouse Filtering
At the core of SteadyMouse is the anti-tremor filtering system that removes the shaking hand motion from your mouse cursor.
- Here you can see tremor removal in action as we toggle the system between on and off. When toggled off the cursor
is all over the place. When toggled on a tiny crosshair-dot shows the chaotic raw mouse motion while the cursor
itself becomes smooth and steady.
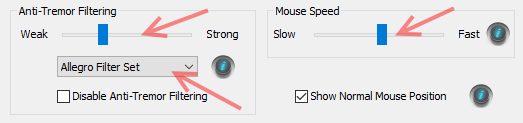
- In the settings window you will find a powerful slider-bar to adjust the strength of this filtering. After clicking
and dragging it with the mouse, you can also use the arrow keys on your keyboard to make small adjustments.
- As you move the selector to the left, the mouse gets snappier however tremor begins to seep through. As you move the
selector right, the tremor removal gets really good, however lag increases. Experiment to find the weakest
setting that still removes the shake.
- Adjacent to the filter strength slider, you will also notice the traditional mouse speed control is present.

- It is recommended that you keep the mouse speed within the illustrated green rectangle for best results.
Above the half-way point especially, the cursor motion may exhibit a wobbly feeling.
- As a general tip to make life easier, you can use the "tab key" on your keyboard to move from control to control.
When a slider bar is highlighted you can use the left and right arrow keys to make fine tuning adjustments. Tap
the left arrow to move the slider left and tap the right arrow to move right.
- If you find yourself space constrained, an extra large mouse pad is recommended to give you ample freedom to move the mouse about.
- Ready for more advanced instruction? Read about Filter Sets and
Filter Tuning below.
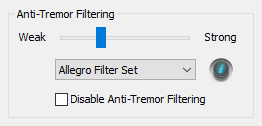
Filter Sets
The tremor removal system contains multiple filter sets that significantly affect the feel of the mouse. Some sets are very snappy
(eg: Feather and Classic). Other sets are very smooth but with more lag (eg: Adagio). By experimenting you can find the filter sets
that work well for you. Be sure to try various filter strength slider bar adjustments for each filter set. The sweet spot is not
always the same from one to the next.
Descriptions:
- Allegro - This is the default filter set, with a nice medium balance between tremor removal and cursor snappiness.
- Feather - The snappiest filter set and one of the most popular. If it is strong enough for your tremor it comes highly recommended! (Previously called "Gaming" prior to v2.3.2)
- Adagio - This is a heavier filter set, less snappy than others yet powerful enough to handle the worst of tremors with class.
- Classic - The original filter set from SteadyMouse v1 with a wide range going from snappy to decently heavy. It's an oldie but goodie!
- Artistry - Great for drawing pretty lines and curves in Photoshop.
- Laggy - The most insanely heavy filter set in the arsenal, designed for magnitude 10 earthquakes and beyond.
- Experimental - Used for trying new things and will periodically change. If feedback is good, it becomes an official new choice. When bad, it gets replaced.
- Steadicam - Newly avaliable in 2.8.2.0 and later, this filter is meant for camera stabilization primarily for artistic work.
Filter Tuning
Adjusting the anti-tremor filtering settings takes some experimenting.
The goal is to find the weakest filter setting that still removes the tremor motion. This will
give you the snappiest cursor response while keeping the mouse under control.
It's best to start out with a slow mouse speed and an overly-heavy filter strength and then ease up from there.
This way you maintain control the whole time. If it helps, you can click on each slider bar and then use
the left and right arrow keys to make adjustments from there. Below are the recommended steps to
dial in the anti-tremor settings:
- Ideally, make sure your mouse has plenty of room to move freely. An extra large mouse pad is a good idea.
- For now, set your mouse speed below ten percent or less. We'll increase it again later.
- Set the filter strength around 95% and observe if any tremor gets through. The mouse will feel like it's in
molasses but should at least be smooth.
- Try different filter sets until you have one where there is not any tremor getting through.
- Any filter set that fails to remove your tremor near maximum strength is not worth tuning.
Move on to another one. You want to have some room for adjustment.
- Some recommended filter sets in order of preference are "Feather", "Allegro", "Adagio" and "Classic".
"Feather" is very snappy but may not be strong enough. "Adagio" is very very strong but can feel laggy.
"Allegro" is in between. "Classic" has a wide range between snappy and heavy. Choose the snappiest
filter that removes all of your tremor.
- Once you have found a filter set strong enough for you, it's time to back off the filter strength
to get some responsiveness back. Begin decreasing the filter strength until tremor starts getting
through again. Then raise it just a little.
- Now raise the mouse speed bit by bit until you're happy with it. As you do this, some tremor may
begin to get through again. When this happens, you can either bump the filter strength a bit more
to compensate or back off the mouse speed.
- TIP: It's recommended, regardless of tuning settings, to stay below 50% on mouse speed. Windows
throws away accuracy by upscaling when above that mark.
- Lastly, feel free to try both a light weight mouse and a weighted mouse. The former lets SteadyMouse
do all the filtering and the latter lets the mouse absorb some of the tremor. The jury is still out
on which is best.
Ignore Accidental Clicks
SteadyMouse contains an advanced system for ignoring unintentional mouse clicks. If you find your fingers constantly hitting
the mouse buttons during use, then this feature can help out quite a bit.
Video Walkthrough
Written Walkthrough With Screenshots
- The "Button Settings" group in the settings window contains all options for ignoring clicks.
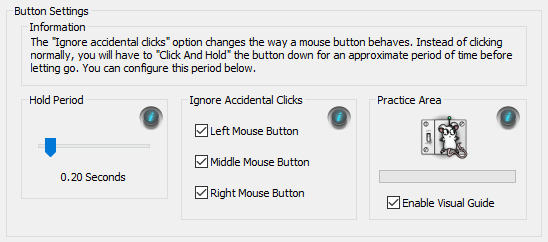
- Check the box for each mouse button that has been causing trouble.
- Now try clicking and notice that nothing happens! Fast clicks are blocked!
- Alright, great you say, but how do I click when I actually wish to?
- Rather than just tapping to click like normal, try holding the button down just a little longer.
If "Enable Visual Guide" is checked when you do this, then you'll see a nice indicator appear
next to your mouse cursor.
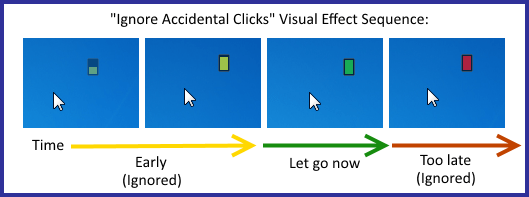
- Here's an example, where you can see the user first clicking rapidly, then clicking for too long,
and then hitting the sweet spot at which point the right-click menu appears.
- The visual indicator behaves a bit like a stop light. If you press and hold a button the indicator will appear and start to change.
To have a click get through simply let go when the indicator turns green. Clicks that get released when the indicator is yellow
or red get ignored.
The special case of left mouse button clicks:
- The one exception to the above is the left mouse button which behaves only slightly differently.
- The left mouse button is unique in that it must support both double-click and click+drag capability.
- When "Ignore accidental clicks" is enabled for the left button, you still click-and-hold a tad bit longer,
however as soon as the "hold period" is reached (ie: When the indicator goes green) the down-click occurs.
SteadyMouse holds that down-click until you release the button to allow click+drag capability. Additionally,
two back to back left clicks become a double-click.
- Sometimes experimenting is easier than explaining. Try it out and you'll get the hang of it pretty quickly.
Within half an hour it will be second nature.
PRO TIP: Set the "hold period" to the smallest value that works for you. For many users, accidental clicks are very rapid, and a "hold period"
between 0.1 and 0.2 seconds works very well. When it's set that low, you'll barely notice the system anymore and your intentional clicks only
have to be the tiniest bit longer than the accidental ones in order to get through. It'll be like the old days before this was a problem.
Icon Targeting System
The "Icon Targeting System" is the "pull" whereas the filtering system is the "push". They both work together to boost
your productivity. With Icon Targeting it's possible to move very fast once you become proficient at using it. It works
by constantly scanning for clickable content on your screen. After locating buttons, check boxes, icons, etc. it highlights
the item nearest to your cursor, placing a spinning target over it. A simple double-tap of a trigger key (configurable)
then snaps your cursor to that target and automatically clicks it for you (or holds the cursor so you can click).
- To enable Icon Targeting, check the box on the right side of the settings window (Just a warning, this does require a bit of CPU).
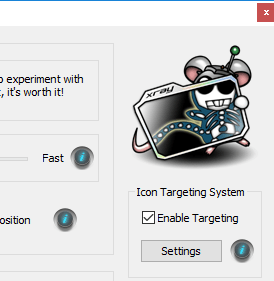
- If you click the "Settings" button then the "Icon Targeting Settings" window will open. Here you can configure what key will trigger
snapping the cursor to the closest target and whether, upon getting there, it clicks for you or holds the cursor in place briefly.
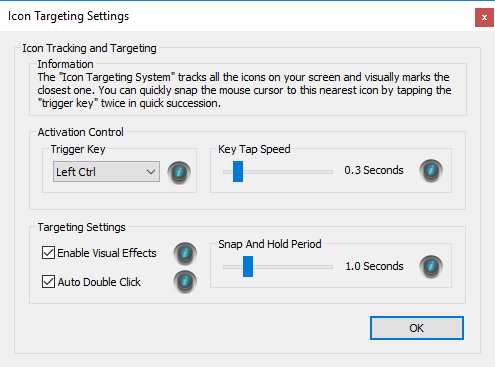
- Notice the triangular target above the OK button in this example. That's what the nearest target looks like. All the user needs
to do is get their cursor close enough to a target and double-tap the trigger key. No need to be right on it anymore.
- The target actually grows and shrinks based on the distance of the cursor from it, and in relation to the icon size itself.
- Finally, the system has experimental ability to target URLs in web pages. This is best supported in Firefox and Microsoft Edge.
Note: If you get a little popup in Firefox saying accessibility is temporarily limited, see
here
for a workaround.

Wacom Tablet Support
SteadyMouse contains experimental settings to support use with "Pen Tablet" devices such as the
"Wacom Intuos". Changes are necessary to both the pen device configuration as well as the
SteadyMouse settings.
Cinematic Camera Stabilization
SteadyMouse can be used as a steadicam for active camera
stabilization in conjunction with 3D modeling software.
Credit for the above rendering in Blender 3D goes to Reddit user
/u/lotsalote
For details on how to set this up in SteadyMouse, please visit the dedicated section of the gaming page:
Normal Quit
SteadyMouse has a "system tray" icon in the lower right hand corner of the screen.
It is often hidden under a little carat symbol on newer versions of Windows. Click this,
then find the mouse icon. Right click it to bring up the SteadyMouse menu. Then click "Exit".
If the application is unresponsive or you need to force SteadyMouse to close without using a mouse, see the
force quit section of the manual. There is a special keyboard only way to shutdown.
Gaming Support
SteadyMouse contains experimental settings to support use in games. It can be setup to provide tremor removal
or alternatively to create a high precision, responsive, yet beautifully smooth, mouse signal for competitive
performance purposes.
At present, game support coverage is approximately 50 percent, with line of sight to eventual full coverage.
This is because the majority of modern games use one of two methods for acquiring mouse input from the user.
SteadyMouse supports integration with one of those methods. For the full details on how
to configure for gaming, visit the page here:
Visual Effects
SteadyMouse contains a handful of visual effects to give helpful cues at just the right times.
- The "Ignore Accidental Clicks" visual indicator helps guide you when making a valid click.
- The "Normal Cursor Crosshair" lets you subtly glimpse what the cursor would be doing without filtering, and
additionally helps you with tuning your settings. It even fades away when close to the actual cursor so you
don't get distracted by it

- The help bubbles provide background information and tips on each major control.
- The dynamic target effect shows you the nearest clickable item you can snap the cursor to.
- Screen overlay bubbles notify you of major status changes, like toggling the SteadyMouse system state.

Troubleshooting
As a first step, if something seems wrong try Toggling Off. If the problem
goes away, this is a decent sign there is a bug. If the problem persists there are a few more things to try:
- Try completely quitting SteadyMouse. The software is designed to have no effect on your system when NOT running.
- If the problem does NOT go away when you shutdown SteadyMouse then it is likely a more general computer problem, unrelated to the software.
- Try a second mouse if you have one. Sometimes batteries die, wires fatigue, and button switches wear out.
Comparing with another mouse will help distinguish a failing mouse from a software problem.
- Reboot the computer so you have a fresh start.
- With SteadyMouse running again, open settings and turn off individual features to narrow down if one of them in particular makes a difference:
- Uncheck "Enable Targeting".
- Check "Disable Anti Tremor Filtering".
- Uncheck "Ignore Accidental Clicks" for each button.
- If there is any other mouse software that could be interfering try quitting (or even uninstalling) it to see if the problem persists.
- Your debug log file would be a huge help if you do not mind sending it.
- Please email support so it can be investigated.
- If a previous version worked better, you can always go back by running that version's installer. All prior versions are available on the downloads page.
Specific Issues and Fixes
Due to the great diversity of Windows configurations in the wild, SteadyMouse occasionally
encounters rare and difficult problems. Due to the detail sometimes necessary, there is a
dedicated troubleshooting page with background, workarounds, and fixes.
Advanced Debugging
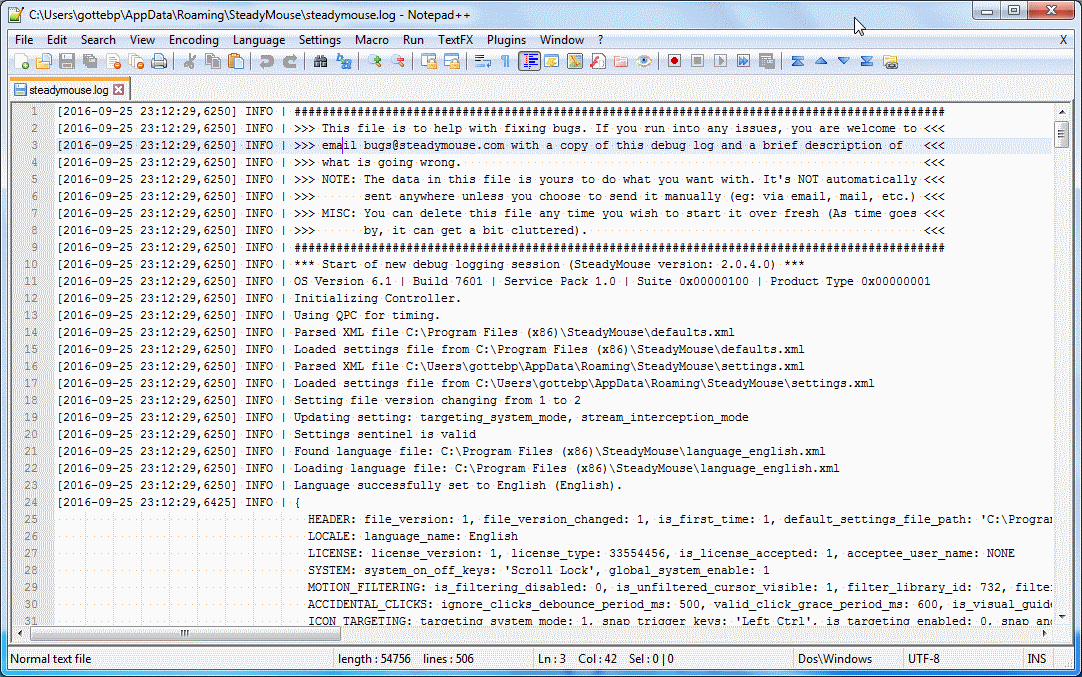
SteadyMouse contains a highly detailed debugging log that can be consulted if any bugs or anomalies are noticed during operation.
- To access this debug log, first open the "About" window clicking the "mouse cartoon"
in the upper right corner of the SteadyMouse settings window.
- Then click the "View Debug Log" button.

- The log file will automatically open in your default text editor.

- The information is in chronological order with newer entries appended to the bottom and older entries towards the top.
- The terminology is very "software engineering-ish" however you are welcome to have a look. If you see any lines with ERROR or FATAL,
I'm happy to help. Simply copy and paste the relevant section and email it to support@steadymouse.com
- The log file can be a tremendous help with debugging if you are open to sharing some or all of it.
With that said, the file is YOUR data to do what you want with. It is never automatically sent
anywhere unless you choose to do so manually.
Force Quit
In the rare event of a major problem with SteadyMouse, such as disappearance of the cursor, or loss of filtering, you can force it to
shutdown by holding down the left and right arrow keys on your keyboard for 5 seconds. This will cause SteadyMouse
to attempt a graceful exit first and if that fails (after about 4 seconds) it will attempt a non-graceful shutdown.
Note: Prior to SteadyMouse 2.6.3.0 it was necessary to hold all four arrow keys to accomplish this (Up, Down, Left, and Right).

If such a scenario ever happens where you actually need this, please email
support@steadymouse.com so whatever caused the problem can be fixed.
How Versioning Works
All SteadyMouse 2 (and later) licenses come with access to minor version updates and bug fixes. The high end
license includes access to major versions in addition to all the rest.
SteadyMouse version numbers take the form "A.B.C.D" where A is the *major* version number and B, C, and D
are *minor* version numbers. For example: SteadyMouse 2.4.7.0 was released on December 24th, 2017.
The version of SteadyMouse can be seen at the bottom of the "About" window within the application.

- Changes to 'A' will happen upon major additions of new features, occuring approximately once or twice a year.
- Changes to 'B' will happen upon significant updates to existing features.
- Changes to 'C' occur upon any bug fixes and minor tuning changes.
- The meaning of 'D' is still up in the air.
In short, minor version numbers get bumped for any bugfixes and small improvements to existing features,
and every customer has access to these.
Changing License Types
Within the first 70 days of purchase, if you wish, you can easily upgrade license types. There are a few quick steps:
- Contact support@steadymouse.com and I will issue you a no-hassle refund of your previous license.
- Purchase the license you want on the SteadyMouse website.
- Download the new installer (since it goes with the license type)
- Run the installer (No need to uninstall the previous version. The SteadyMouse installer is aware of these things).
- Upon running SteadyMouse the first time after this, the product activation window will open.
- Activate using the product key that goes with that new license type.
Changing Product Keys
Changing product keys is fairly simple:
- First quit SteadyMouse.
- Next, find the SteadyMouse application group in the Start Menu.
- Click the "License" folder to expand it.
- Click the "Change Product Keys" shortcut

- SteadyMouse will launch and open the product activation window.
- Change keys if you wish. Only click activate if you wish to use an activation!
- If you change your mind just exit out and the previous activation will be reverted to the next time SteadyMouse runs.
Removal
Uninstalling SteadyMouse is just like any other application on Windows. That said, the guide below will take you through it step-by-step.
Video Walkthrough
Written Walkthrough With Screenshots
- Type "Uninstall" into the Windows search bar.

- Click "Add or Remove Programs"

- Find SteadyMouse in the list, select it, and click "Uninstall"

- If it asks about other instances you can select Continue

- It will ask for confirmation that you are sure.

- When it asks about deleting settings I usually recommend clicking "NO" as otherwise, the activation will get deleted and have to run again
if you ever choose to re-install. On the other hand, if you are trying to switch to a different license key, then click "YES" here and all
settings, including the last activation, will be removed.

- Wait for the progress bar to complete.

- Click "OK" and you are done removing SteadyMouse.

Easy Refunds
 As the founder of SteadyMouse, LLC. I am confident you will be impressed with SteadyMouse and I stand
behind my product. It's also super important to me that you have an experience commensurate with
what you've paid for. If for any reason you are not completely satisfied during the first
70 days after purchase, simply email me for a full, no hassle, refund. I can be reached easily and
directly at
ben@steadymouse.com
As the founder of SteadyMouse, LLC. I am confident you will be impressed with SteadyMouse and I stand
behind my product. It's also super important to me that you have an experience commensurate with
what you've paid for. If for any reason you are not completely satisfied during the first
70 days after purchase, simply email me for a full, no hassle, refund. I can be reached easily and
directly at
ben@steadymouse.com
The refund policy is designed to let you take the latest SteadyMouse software for a spin with
full assurance it will be worthwhile. In short, you will find your mouse experience greatly
improved or you will get your money back.
- Yes, you are allowed to install and activate AND still get a refund if you choose.
- You can have this refund for ANY reason at ANY time in the first 70 days.
- We'll send you a reminder email around day twenty-five so you don't forget to make a decision.
- To initiate simply send an email, from the email address you purchased with, saying "Please refund".
- That's it. Your full refund receipt will arrive within 24 hours. Easy peasy!
- SteadyMouse, LLC. pledges that this will be a no hassle experience. Companies that give
people the run-around are terrible!
- If you feel inclined, tell us about your experience. Feedback drives change.
Outside the 70 days? Send a note explaining the situation and we'll work something out.
- 1 Website Translation
- 2 User Community
- 3 Multiple Computers
- 4 Minimum Requirements
- 5 Compatible Mouse Types
- 6 Purchase
- 7 Download
- 8 Installation
- 9 Product Activation - Simple
- 10 Product Activation - Manual
- 11 Alternate Download Method
- 12 Checking for Updates
- 13Language Selection
- 14First Time Running
- 15General Configuration
- 16System Tray
- 17 Opening Settings
- 18 System Toggle Key (ie: On / Off)
- 19 Anti-Tremor Filtering
- 20 Filter Sets
- 21 Filter Tuning
- 22 Ignore Accidental Clicks
- 23 Icon Targeting System
- 24 Wacom Tablet Support (Experimental)
- 25 Cinematic Camera Stabilization
- 26 Normal Quit
- 27Gaming
- 28Visual Effects
- 29Troubleshooting
- 30Force Quit
- 31How Versioning Works
- 32Changing License Types
- 33Changing Product Keys
- 34Removal
- 35Easy Refunds
Website Translation
To translate this website from English into your local language, use the control in the upper-right corner of the page.
User Community
At times it is nice to connect with other users and share ideas, bugs, annoyances, likes, dislikes, etc.
The Reddit forum /r/steadymouse has been created as a place for SteadyMouse users to discuss anything they wish regarding the software. The problems it solves, and ones they wish it would solve, criticism, feedback, etc. is all fair game. Please feel welcome to create a new post or join an existing one.
The hope is we will be able to make a small community and the voting there can be useful in showing how important a topic is to everyone. This way, you can influence the direction the software takes next in cooperation with others in the community. We can refine ideas together.
Multiple Computers
Your SteadyMouse purchase comes with the freedom to install and activate the software on all of your personal computers for personal use (within reasonable limits). In other words, it's expected that a user with several devices, such as a desktop computer in their study and a laptop in the living room, will install SteadyMouse on each of them. This is perfectly fine, as long as it's for the user the license was intended for.
NOTE: If purchasing for multiple users, you have the option of buying multiple keys or purchasing a single key that has multiple users on it. This can be done via the "quantity" field at checkout.
To install on several computers you will simply need the installer and your product key. One easy way is to access your purchase receipt email on each computer you wish to install on. Then run through the Installation and Activation steps like normal.
Minimum Requirements
- Windows 11 (x86, x64, ARM64)
- Windows 10
- Windows 8.1
- Windows 8
- Windows 7
- Windows Vista
- Windows XP (SP3)
- Windows Server 2016
- Windows Server 2012
- Admin rights are necessary just to install or upgrade.
- Basic user rights are all that is needed to run SteadyMouse.
- All known types of mice are supported
- You can find a list of tested mouse types here
- Apple MacOS (and potentially Linux) support is NOT YET available however work is in progress.
- You may sign up here to be notified when it is ready.
- ETA is unknown as this work is extremely difficult.
- If you purchased "SteadyMouse X (All Versions)", you will have access to it when ready.
Compatible Mouse Types
Supported mice:
- Wired mouse (USB, PS/2, etc.)
- Wireless mouse (USB, Bluetooth, etc)
- Trackpad
- Roller ball mouse
- Contour RollerMouse
- Pointing stick
- Nintendo Wii Remote
When experimenting, you can connect multiple mice at once and quickly switch between them. It is also recommended to get an extra large mouse pad, so you have a nice amount of space and do not find the mouse frequently hitting the edge of the pad.
It is recommended to experiment with different mice until you find which you like best. Things like the physical weight, optical vs. laser, wired vs wireless, and mouse pad size all can make a positive difference.
Purchase
If you have not already bought SteadyMouse, you can do so at the purchase page. Take a glance at the steps below for an overview of what that looks like.
The steps to buy SteadyMouse are as follows:
- First choose the desired license type from the options at the bottom of the purchase page.
- Next select the quantity of licenses you wish to have. Usually this is just one license per individual that will be using the software. Then click the "Buy This" button when you are ready.
- A form will appear and you will be directed to enter your email and payment information to complete the purchase process.
- Take special care to enter a correct email address so you receive a copy of your purchase receipt. If the email to you bounces due to a misspelling or typo, it may result in an automatic refund after a few days.
- After completing the purchase a pop-up will appear containing a View Content button that you can click to access both your Product Key and the Download Link for the installer.
- A copy of this same information along with your Product Key is sent to your email and should arrive within ten minutes. Please make sure the email is received. If it does not show up, check your spam folder. If it is not there either then please contact support@steadymouse.com
- Your purchase receipt email is helpful anytime you need to download a fresh copy of SteadyMouse. It is recommended that you keep a copy saved for the future.
- Once you have your purchase receipt email, proceed to the next section to download a copy of SteadyMouse for the first time.


Tip: Need an invoice for your purchase? Open your purchase receipt email. There is a "Generate" link at the bottom that will make one for you.
Download
After purchase you should have an email with your SteadyMouse purchase receipt. Open it up and take a look. This email contains everything needed to get up and running. Downloading and installing the setup file is pretty typical. You can see an overview of these steps below.
Video Walkthrough
Written Walkthrough With Screenshots
Alright then, let's download SteadyMouse to your computer so we can get it installed! The steps are as follows:
- This is what the purchase receipt email looks like:
- First, notice the View Content button within the email. Clicking this button will take you to a download page where you can get the SteadyMouse installer for your computer.
- Also within the email, take note of your Product Key as it will be needed later to activate the software.
- When you are ready, click the View Content button.
- A new tab will then open in your browser and the page that loads will have a download button. Click it to begin the download.
- Your browser will show the progress of the download either near the bottom (Chrome), or in the upper right corner (Firefox). See the blue arrow in the image below for an example of how it normally looks.
- Once your download of the SteadyMouse setup file completes, simply click on it to run the installation. If you do not see anything to click on in your browser, check your Downloads Folder and see if the file is there. The file name starts with "SetupSteadyMouse..."
- If upon running the installer, a security warning appears, click Run.
- Click Yes at the "User Account Control" prompt.
- The installation itself is pretty typical. If you prefer step-by-step instructions, continue to the next section on installation below.


Installation
Once you have downloaded a copy of the SteadyMouse setup file (see the previous section), these steps will help you to install it:
- If you haven't done so already, double click the SetupSteadyMouse file to begin the installation.
- The installer should begin to run. If nothing seems to happen see here.
- Click "Yes" at the prompt.
- Select your language
- At the welcome screen click the Next button.
- Read over and accept the End User License Agreement
- Check or uncheck the box to select whether you would like SteadyMouse to startup automatically every time your computer powers up. Then click Next.
- Click Install to confirm your wish to install SteadyMouse
- You will see a progress bar indicating the installation status. This usually takes less than 30 seconds to complete.
- Click Finish to complete the installation.
- Once installed, you can launch the SteadyMouse application anytime by double-clicking the desktop icon.
- You are almost there, and just need to use your Product Key to activate now! Continue to the next section on product activation for these last few steps.
- Tip: Double clicking the desktop icon AFTER SteadyMouse is ALREADY RUNNING will bring up the settings window.
Product Activation - Simple
Activation is a one time thing, per computer, and requires an internet connection just once.
- You should have a Product Key recieved in your email after purchase.
- When you run SteadyMouse the first time, it will ask you to activate. Enter your Product Key in the provided field.
- Optional Step: If you need to go through a proxy server, click "Show Advanced Options" and then enter it.
- Click "Activate" and you will see a progress bar as it performs the one time activation with the server. If all goes well, you will see this success message:
- All done! You should never have to activate on this computer again unless you intentionally uninstall the software. Updates that fall under your license are seamless and your activation will automatically carry over from one update to the next.
Product Activation - Manual
Activation is a one time thing per computer and requires an internet connection just once. Manual Activation is
useful if you wish to get SteadyMouse up and running without having the software talk directly to the activation server.
Everything happens via your default web browser. To activate manually do the following:
- You should have a Product Key recieved in your email after purchase.
- When you run SteadyMouse the first time, it will ask you to activate.
- Enter your Product Key and then click the "Show Advanced Options" check box.
- Click "Get Confirmation Code" and your default web browser will automatically launch. A page should then load containing your confirmation code. This uses one activation.
- Copy and paste the confirmation code from the webpage into the "Manual Confirmation Code" field.
- Click "Activate Manually" and you should see the success message appear:
- All done! You should never have to activate on this computer again unless you intentionally uninstall the software. Updates that fall under your license are seamless and your activation will automatically carry over from one update to the next.
Alternate Download Method
For most users, clicking the View Content button in their purchase receipt email will be enough to get a copy of the software. For cases where this is not ideal, or not working, there is an alternate download method provided. You will need your Product Key.
- Visit the downloads page
- Select your License Type
- Enter your Product Key
- Click Submit
- Provided the information entered is valid, you should be directed to the download page.
Checking for Updates
SteadyMouse contains an easy way to check for new updates. Access to new versions is built right into the application, so all it takes is a few clicks.
Video Walkthrough
Written Walkthrough With Screenshots
- With SteadyMouse already running, double click the desktop icon to bring up the main settings window.
- From the SteadyMouse settings window click the little mouse cartoon in the upper right corner. This will open the "About Window"
- Once the About Window is open, click the "Check for Updates" button on the right hand side.
- The settings window for the periodic update reminder will appear. Click the Check Now button.
- Your default web browser will automatically open to a page with download options
- If you are already up to date you will see this:
- If a newer version is available you will see this:
- If an update is indeed available, click the big "Download SteadyMouse" button to begin downloading the new installation file.
- After the file is finished downloading, simply click on it to start the installer.
- When the browser security warning appears, click Run.
- Click Yes at the User Account Control prompt.
- Run through the installation steps like normal and you are all set!
- If desired, you can find more detailed instructions regarding the installer steps in the install section of the manual.
- Your settings and product-activation are automatically preserved from update to update.

Note: An alternative way to "Check for Updates" is available by right clicking the system tray icon (See the green arrow in the picture below). This icon is found in the lower right corner of your desktop. A menu will appear and then from there you can click "Check for Updates" (See the blue arrow in the picture).
Language Selection
SteadyMouse 2 comes with language support for English, Brazilian Portuguese, Danish, Dutch, French, German, Italian, Russian, and Spanish.
- The first time you run SteadyMouse it will ask you to select your language. Choose your language and select OK.
- You can return to the above window to change the language any time by right clicking the system tray icon and clicking "Language"
- Linguistic translation work is always ongoing as new text is added to the software for new and upcoming features. For early access to upcoming language files that are not yet included in an installation, visit the Translation Status page.
First Time Running
The first time you run SteadyMouse it will take you through the welcome sequence (one time only).
- First, you will get a welcome window with a basic overview of features to get you started.
- After this, SteadyMouse may make a few one-time adjustments to Windows mouse settings. This usually includes turning off "Enhanced Pointer Precision" because it actually degrades precision.
- The SteadyMouse settings window will automatically be opened for you to explore. Try experimenting with the various controls and clicking the help bubbles to find out what they do!
- Once you close the settings window, you can always return to it by double clicking the desktop icon.
General Configuration
The main settings window in SteadyMouse has all the adjustments you need in one easy to reach place.
- The controls are grouped into several categories that we will focus on one at a time.
- "Anti-tremor Filtering" focuses on removal of shaking hand motion from your cursor.
- "Ignore Accidental Clicks" functionality focuses on blocking unintended button clicks from getting through.
- "Icon Targeting" capability focuses on locating the nearest "clickable item" to your cursor and clicking it for you with the double-tap of a "trigger key".
- "System Toggle Switch" functionality turns all features on and off together, from anywhere.
- Feel free to experiment and get a "hands on" feel for what each feature does! You won't break it!
- You can click the "help bubbles" in each section to get the full details on what each control does.
- If you run into any trouble just toggle SteadyMouse off using the "Num Lock" key (Or whatever toggle key you have set in category #4).
- Once you are familiar with the basics and ready to go deeper, each of the control categories has its own section in the manual.
- Opening Settings
- System Toggle Key (On / Off)
- Anti-Tremor Filtering
- Ignore Accidental Clicks
- Icon Targeting System
- After you have things to your liking, click "OK" and the window will disappear and SteadyMouse will run hidden in the background.
System Tray
When SteadyMouse is running it is accessible via a system tray icon in the lower right corner of the Start Bar. On newer versions of Windows it is hidden behind a caret symbol. If so, click that first.
- This icon is a small image of a mouse with either a green '+' or a red '-' depicting whether SteadyMouse is toggled on or off.
- Double clicking the icon will bring up the configuration window.
- Right clicking the icon will bring up a menu with various options to change things like language, check for updates, etc (See the image).
- To quit SteadyMouse right click the icon and click "Exit" on the menu.
Opening Settings
After SteadyMouse is already running, just double click the desktop icon to open the settings window.
System Toggle Key (On / Off)
Toggling Between On and Off
- The current toggle key setting is displayed in an information bubble shown every time SteadyMouse starts up.
- Whenever this toggle key is pressed, all of SteadyMouse transitions back and forth between enabled and disabled.
- You will additionally notice several graphical indicators appear to illustrate the change, and of course the mouse will feel different accordingly.
Toggle Key Shortcut to the Settings Window
- You can use the toggle key to quickly access the settings window.
- Simply press and hold it down for at least 3 seconds, then let go.
- Rather than toggle like normal, the settings window will appear for you.
Changing the Toggle Key(s)
- In the old SteadyMouse v1.3, the only option for the "Toggle Key" was "Scroll-Lock". Scroll lock is nice since it's a rarely-used key, and often has a light on the keyboard giving you a visual indicator of the status, however many newer keyboards do not have it.
- With SteadyMouse 2.6.3.0 and later, "Num-Lock" is now the default toggle key. It is also configurable in settings and via a prompt the first time the software runs. If your keyboard does not have the Num-Lock key please select a different option.
- To change your system-wide toggle key, open the SteadyMouse settings window and click the "On / Off Control" Settings button on the right hand side.
- The System Toggle Settings window contains a drop down list with several alternative toggle key(s). Select the desired key combo and click OK.
- This key-combo can be pressed anytime, from anywhere, to toggle all of SteadyMouse on and off.
Anti-Tremor Mouse Filtering
At the core of SteadyMouse is the anti-tremor filtering system that removes the shaking hand motion from your mouse cursor.
- Here you can see tremor removal in action as we toggle the system between on and off. When toggled off the cursor is all over the place. When toggled on a tiny crosshair-dot shows the chaotic raw mouse motion while the cursor itself becomes smooth and steady.
- In the settings window you will find a powerful slider-bar to adjust the strength of this filtering. After clicking and dragging it with the mouse, you can also use the arrow keys on your keyboard to make small adjustments.
- As you move the selector to the left, the mouse gets snappier however tremor begins to seep through. As you move the selector right, the tremor removal gets really good, however lag increases. Experiment to find the weakest setting that still removes the shake.
- Adjacent to the filter strength slider, you will also notice the traditional mouse speed control is present.
- It is recommended that you keep the mouse speed within the illustrated green rectangle for best results. Above the half-way point especially, the cursor motion may exhibit a wobbly feeling.
- As a general tip to make life easier, you can use the "tab key" on your keyboard to move from control to control. When a slider bar is highlighted you can use the left and right arrow keys to make fine tuning adjustments. Tap the left arrow to move the slider left and tap the right arrow to move right.
- If you find yourself space constrained, an extra large mouse pad is recommended to give you ample freedom to move the mouse about.
- Ready for more advanced instruction? Read about Filter Sets and Filter Tuning below.
Filter Sets
The tremor removal system contains multiple filter sets that significantly affect the feel of the mouse. Some sets are very snappy (eg: Feather and Classic). Other sets are very smooth but with more lag (eg: Adagio). By experimenting you can find the filter sets that work well for you. Be sure to try various filter strength slider bar adjustments for each filter set. The sweet spot is not always the same from one to the next.
Descriptions:
- Allegro - This is the default filter set, with a nice medium balance between tremor removal and cursor snappiness.
- Feather - The snappiest filter set and one of the most popular. If it is strong enough for your tremor it comes highly recommended! (Previously called "Gaming" prior to v2.3.2)
- Adagio - This is a heavier filter set, less snappy than others yet powerful enough to handle the worst of tremors with class.
- Classic - The original filter set from SteadyMouse v1 with a wide range going from snappy to decently heavy. It's an oldie but goodie!
- Artistry - Great for drawing pretty lines and curves in Photoshop.
- Laggy - The most insanely heavy filter set in the arsenal, designed for magnitude 10 earthquakes and beyond.
- Experimental - Used for trying new things and will periodically change. If feedback is good, it becomes an official new choice. When bad, it gets replaced.
- Steadicam - Newly avaliable in 2.8.2.0 and later, this filter is meant for camera stabilization primarily for artistic work.
Filter Tuning
Adjusting the anti-tremor filtering settings takes some experimenting. The goal is to find the weakest filter setting that still removes the tremor motion. This will give you the snappiest cursor response while keeping the mouse under control.
It's best to start out with a slow mouse speed and an overly-heavy filter strength and then ease up from there. This way you maintain control the whole time. If it helps, you can click on each slider bar and then use the left and right arrow keys to make adjustments from there. Below are the recommended steps to dial in the anti-tremor settings:
- Ideally, make sure your mouse has plenty of room to move freely. An extra large mouse pad is a good idea.
- For now, set your mouse speed below ten percent or less. We'll increase it again later.
- Set the filter strength around 95% and observe if any tremor gets through. The mouse will feel like it's in molasses but should at least be smooth.
- Try different filter sets until you have one where there is not any tremor getting through.
- Any filter set that fails to remove your tremor near maximum strength is not worth tuning. Move on to another one. You want to have some room for adjustment.
- Some recommended filter sets in order of preference are "Feather", "Allegro", "Adagio" and "Classic". "Feather" is very snappy but may not be strong enough. "Adagio" is very very strong but can feel laggy. "Allegro" is in between. "Classic" has a wide range between snappy and heavy. Choose the snappiest filter that removes all of your tremor.
- Once you have found a filter set strong enough for you, it's time to back off the filter strength to get some responsiveness back. Begin decreasing the filter strength until tremor starts getting through again. Then raise it just a little.
- Now raise the mouse speed bit by bit until you're happy with it. As you do this, some tremor may begin to get through again. When this happens, you can either bump the filter strength a bit more to compensate or back off the mouse speed.
- TIP: It's recommended, regardless of tuning settings, to stay below 50% on mouse speed. Windows throws away accuracy by upscaling when above that mark.
- Lastly, feel free to try both a light weight mouse and a weighted mouse. The former lets SteadyMouse do all the filtering and the latter lets the mouse absorb some of the tremor. The jury is still out on which is best.
Ignore Accidental Clicks
SteadyMouse contains an advanced system for ignoring unintentional mouse clicks. If you find your fingers constantly hitting the mouse buttons during use, then this feature can help out quite a bit.
Video Walkthrough
Written Walkthrough With Screenshots
- The "Button Settings" group in the settings window contains all options for ignoring clicks.
- Check the box for each mouse button that has been causing trouble.
- Now try clicking and notice that nothing happens! Fast clicks are blocked!
- Alright, great you say, but how do I click when I actually wish to?
- Rather than just tapping to click like normal, try holding the button down just a little longer. If "Enable Visual Guide" is checked when you do this, then you'll see a nice indicator appear next to your mouse cursor.
- Here's an example, where you can see the user first clicking rapidly, then clicking for too long, and then hitting the sweet spot at which point the right-click menu appears.
- The visual indicator behaves a bit like a stop light. If you press and hold a button the indicator will appear and start to change. To have a click get through simply let go when the indicator turns green. Clicks that get released when the indicator is yellow or red get ignored.
The special case of left mouse button clicks:
- The one exception to the above is the left mouse button which behaves only slightly differently.
- The left mouse button is unique in that it must support both double-click and click+drag capability.
- When "Ignore accidental clicks" is enabled for the left button, you still click-and-hold a tad bit longer, however as soon as the "hold period" is reached (ie: When the indicator goes green) the down-click occurs. SteadyMouse holds that down-click until you release the button to allow click+drag capability. Additionally, two back to back left clicks become a double-click.
- Sometimes experimenting is easier than explaining. Try it out and you'll get the hang of it pretty quickly. Within half an hour it will be second nature.
Icon Targeting System
The "Icon Targeting System" is the "pull" whereas the filtering system is the "push". They both work together to boost your productivity. With Icon Targeting it's possible to move very fast once you become proficient at using it. It works by constantly scanning for clickable content on your screen. After locating buttons, check boxes, icons, etc. it highlights the item nearest to your cursor, placing a spinning target over it. A simple double-tap of a trigger key (configurable) then snaps your cursor to that target and automatically clicks it for you (or holds the cursor so you can click).
- To enable Icon Targeting, check the box on the right side of the settings window (Just a warning, this does require a bit of CPU).
- If you click the "Settings" button then the "Icon Targeting Settings" window will open. Here you can configure what key will trigger snapping the cursor to the closest target and whether, upon getting there, it clicks for you or holds the cursor in place briefly.
- Notice the triangular target above the OK button in this example. That's what the nearest target looks like. All the user needs to do is get their cursor close enough to a target and double-tap the trigger key. No need to be right on it anymore.
- The target actually grows and shrinks based on the distance of the cursor from it, and in relation to the icon size itself.
- Finally, the system has experimental ability to target URLs in web pages. This is best supported in Firefox and Microsoft Edge. Note: If you get a little popup in Firefox saying accessibility is temporarily limited, see here for a workaround.
Wacom Tablet Support
Cinematic Camera Stabilization
SteadyMouse can be used as a steadicam for active camera stabilization in conjunction with 3D modeling software.
For details on how to set this up in SteadyMouse, please visit the dedicated section of the gaming page:
Normal Quit
SteadyMouse has a "system tray" icon in the lower right hand corner of the screen. It is often hidden under a little carat symbol on newer versions of Windows. Click this, then find the mouse icon. Right click it to bring up the SteadyMouse menu. Then click "Exit".
Gaming Support
SteadyMouse contains experimental settings to support use in games. It can be setup to provide tremor removal or alternatively to create a high precision, responsive, yet beautifully smooth, mouse signal for competitive performance purposes.
At present, game support coverage is approximately 50 percent, with line of sight to eventual full coverage. This is because the majority of modern games use one of two methods for acquiring mouse input from the user. SteadyMouse supports integration with one of those methods. For the full details on how to configure for gaming, visit the page here:
Visual Effects
SteadyMouse contains a handful of visual effects to give helpful cues at just the right times.
- The "Ignore Accidental Clicks" visual indicator helps guide you when making a valid click.
- The "Normal Cursor Crosshair" lets you subtly glimpse what the cursor would be doing without filtering, and additionally helps you with tuning your settings. It even fades away when close to the actual cursor so you don't get distracted by it
- The help bubbles provide background information and tips on each major control.
- The dynamic target effect shows you the nearest clickable item you can snap the cursor to.
- Screen overlay bubbles notify you of major status changes, like toggling the SteadyMouse system state.
Troubleshooting
As a first step, if something seems wrong try Toggling Off. If the problem goes away, this is a decent sign there is a bug. If the problem persists there are a few more things to try:
- Try completely quitting SteadyMouse. The software is designed to have no effect on your system when NOT running.
- If the problem does NOT go away when you shutdown SteadyMouse then it is likely a more general computer problem, unrelated to the software.
- Try a second mouse if you have one. Sometimes batteries die, wires fatigue, and button switches wear out. Comparing with another mouse will help distinguish a failing mouse from a software problem.
- Reboot the computer so you have a fresh start.
- With SteadyMouse running again, open settings and turn off individual features to narrow down if one of them in particular makes a difference:
- Uncheck "Enable Targeting".
- Check "Disable Anti Tremor Filtering".
- Uncheck "Ignore Accidental Clicks" for each button.
- If there is any other mouse software that could be interfering try quitting (or even uninstalling) it to see if the problem persists.
- Your debug log file would be a huge help if you do not mind sending it.
- Please email support so it can be investigated.
- If a previous version worked better, you can always go back by running that version's installer. All prior versions are available on the downloads page.
Specific Issues and Fixes
Due to the great diversity of Windows configurations in the wild, SteadyMouse occasionally encounters rare and difficult problems. Due to the detail sometimes necessary, there is a dedicated troubleshooting page with background, workarounds, and fixes.
Advanced Debugging
SteadyMouse contains a highly detailed debugging log that can be consulted if any bugs or anomalies are noticed during operation.
- To access this debug log, first open the "About" window clicking the "mouse cartoon" in the upper right corner of the SteadyMouse settings window.
- Then click the "View Debug Log" button.
- The log file will automatically open in your default text editor.
- The information is in chronological order with newer entries appended to the bottom and older entries towards the top.
- The terminology is very "software engineering-ish" however you are welcome to have a look. If you see any lines with ERROR or FATAL, I'm happy to help. Simply copy and paste the relevant section and email it to support@steadymouse.com
- The log file can be a tremendous help with debugging if you are open to sharing some or all of it. With that said, the file is YOUR data to do what you want with. It is never automatically sent anywhere unless you choose to do so manually.
Force Quit
In the rare event of a major problem with SteadyMouse, such as disappearance of the cursor, or loss of filtering, you can force it to shutdown by holding down the left and right arrow keys on your keyboard for 5 seconds. This will cause SteadyMouse to attempt a graceful exit first and if that fails (after about 4 seconds) it will attempt a non-graceful shutdown.
Note: Prior to SteadyMouse 2.6.3.0 it was necessary to hold all four arrow keys to accomplish this (Up, Down, Left, and Right).
If such a scenario ever happens where you actually need this, please email support@steadymouse.com so whatever caused the problem can be fixed.
How Versioning Works
All SteadyMouse 2 (and later) licenses come with access to minor version updates and bug fixes. The high end license includes access to major versions in addition to all the rest.
SteadyMouse version numbers take the form "A.B.C.D" where A is the *major* version number and B, C, and D are *minor* version numbers. For example: SteadyMouse 2.4.7.0 was released on December 24th, 2017.
The version of SteadyMouse can be seen at the bottom of the "About" window within the application.
- Changes to 'A' will happen upon major additions of new features, occuring approximately once or twice a year.
- Changes to 'B' will happen upon significant updates to existing features.
- Changes to 'C' occur upon any bug fixes and minor tuning changes.
- The meaning of 'D' is still up in the air.
In short, minor version numbers get bumped for any bugfixes and small improvements to existing features, and every customer has access to these.
Changing License Types
Within the first 70 days of purchase, if you wish, you can easily upgrade license types. There are a few quick steps:
- Contact support@steadymouse.com and I will issue you a no-hassle refund of your previous license.
- Purchase the license you want on the SteadyMouse website.
- Download the new installer (since it goes with the license type)
- Run the installer (No need to uninstall the previous version. The SteadyMouse installer is aware of these things).
- Upon running SteadyMouse the first time after this, the product activation window will open.
- Activate using the product key that goes with that new license type.
Changing Product Keys
Changing product keys is fairly simple:
- First quit SteadyMouse.
- Next, find the SteadyMouse application group in the Start Menu.
- Click the "License" folder to expand it.
- Click the "Change Product Keys" shortcut
- SteadyMouse will launch and open the product activation window.
- Change keys if you wish. Only click activate if you wish to use an activation!
- If you change your mind just exit out and the previous activation will be reverted to the next time SteadyMouse runs.
Removal
Uninstalling SteadyMouse is just like any other application on Windows. That said, the guide below will take you through it step-by-step.
Video Walkthrough
Written Walkthrough With Screenshots
- Type "Uninstall" into the Windows search bar.
- Click "Add or Remove Programs"
- Find SteadyMouse in the list, select it, and click "Uninstall"
- If it asks about other instances you can select Continue
- It will ask for confirmation that you are sure.
- When it asks about deleting settings I usually recommend clicking "NO" as otherwise, the activation will get deleted and have to run again if you ever choose to re-install. On the other hand, if you are trying to switch to a different license key, then click "YES" here and all settings, including the last activation, will be removed.
- Wait for the progress bar to complete.
- Click "OK" and you are done removing SteadyMouse.
Easy Refunds
The refund policy is designed to let you take the latest SteadyMouse software for a spin with full assurance it will be worthwhile. In short, you will find your mouse experience greatly improved or you will get your money back.
- Yes, you are allowed to install and activate AND still get a refund if you choose.
- You can have this refund for ANY reason at ANY time in the first 70 days.
- We'll send you a reminder email around day twenty-five so you don't forget to make a decision.
- To initiate simply send an email, from the email address you purchased with, saying "Please refund".
- That's it. Your full refund receipt will arrive within 24 hours. Easy peasy!
- SteadyMouse, LLC. pledges that this will be a no hassle experience. Companies that give people the run-around are terrible!
- If you feel inclined, tell us about your experience. Feedback drives change.