
Troubleshooting
- 1 Scrolling Makes the Cursor Jump
- 2 Setup File Won't Run
- 3 Launch Error: Referral Returned
- 4 Crazy Cursor Bug
- 5 Mouse Feels Stuttery
- 6 Doesn't Filter in Some Applications
- 7 RoboForm App Toolbar Annoyance
- 8 Click & Drag in Windows 10
- 9 Mouse Clicks Blocked in Windows 10
- 10 Parallels Virtual Machine
- 11 VMWare Fusion Virtual Machine
- 12 VirtualBox Virtual Machine
- 13 Click & ClickLock
Scrolling Makes the Cursor Jump
In 2019, several users reported that mouse wheel scrolling and side button clicks result in the cursor position jumping to the upper left corner of the screen. The problem is resolved in SteadyMouse v2.8 and later, and upgrading is recommended. Additionally, two alternative workarounds are presented below for those on older versions.
Solution #1 - Uninstall Conflicting Software
The problem is caused by an interaction between another software app called "Logitech Options"
and SteadyMouse. The simplest solution is to uninstall this Logitech software for the time being.
On Windows 10 this takes just a few simple steps:
- Click Start Settings Apps Apps & features
- Select the "Logitech Options" app from the installed application list.
- Click Uninstall and follow the steps.
- Reboot your computer and the problem should be gone.
Solution #2 - Change a Hidden Setting
From the SteadyMouse settings window click the little mouse cartoon in the upper right corner. This will open the "About Window"

Once there, repeatedly click the SteadyMouse logo (shown in the image below). This will reveal experimental hidden settings.

Finally Uncheck the option for "Use Raw Input Stream Intercept Mode".
After doing this, you should now be able to use the scroll wheel again without the cursor jumping.
Setup File Won't Run
After downloading the SteadyMouse setup file, typically all you have to do is double click it to run the installation. Sometimes however, upon clicking, nothing happens. This is usually on Windows Vista due to some rough around the edges security features Microsoft later improved upon.
The Workaround
Right click the SteadyMouse setup file and select Properties from the menu. Select the General tab. Then check for the existance of an Unblock Button near the bottom. If it is present, click it and then select OK.

After doing this, you should now be able to double click the installer and it should run properly. If it still does not run try downloading the installer using a different browser such as Chrome or Firefox.
Launch Error: A referral was returned from the server
After installing the SteadyMouse setup file, there is sometimes an error that presents itself. It either manifests at the very end of the install, or upon clicking the icon for the first time:

This issue occurs when Windows is unable to validate the digital signature on the application. "Digital signatures" are how Windows makes sure a file is not damaged or modified after you get it from original creator.
There are several possibilities as to what went wrong:
- Your computer's security "root certificates" are out of date and do not recognize the root authority used to sign SteadyMouse.
- The executable may be corrupt.
- If running on a company computer, your IT administrators may have chosen to limit the accepted "root certificates" installed in your OS.
- You are running ancient Windows Vista which has unresolved bugs with digital signature validation.
The Workaround
There are a few options to try here:
- Run "Windows Update" and reboot. This will make sure your root certificates are up to date.
- Download the latest version of SteadyMouse and reinstall (There is no need to uninstall first).
- If on a company PC ask your IT support for help and show them this page.
- If you are running Windows Vista watch the video guide here for how to disable "User Account Control" as a workaround
Note: If the above all fails to help, a possible alternative Vista fix is documented on this Microsoft Support Page.
Crazy Cursor Bug
In certain rare conditions SteadyMouse can lose control of the cursor.
When this happens it flies to the edge of the screen and gets "stuck" in a corner.
The user then has to toggle SteadyMouse off (via "Num Lock", etc), or just plain kill the
process to get control back. In almost all cases the issue is related to the configuration of
Windows "desktop scaling and dpi" settings.
Starting with SteadyMouse v2.0.6.0, nearly all cases are handled automatically and you will
likely never even see this issue in the first place. If you do encounter loss of cursor control,
please upgrade to the latest version as a first measure. Then, this page can take you further
if it's still even necessary.
Every version of Windows since XP has made unique changes to the ability to scale the size of the desktop user interface. This is known as "DPI scaling" and sometimes "desktop scaling" and is at the heart of the problem with loss of cursor control in SteadyMouse. Since every new Windows version is a little different from the last, it has led to multiple solutions to this problem. I'll show you each of them in order from simplest to most advanced and you're welcome to try the ones you like. They each have tradeoffs, however if you must know, "Solution #3" is my preferred choice.
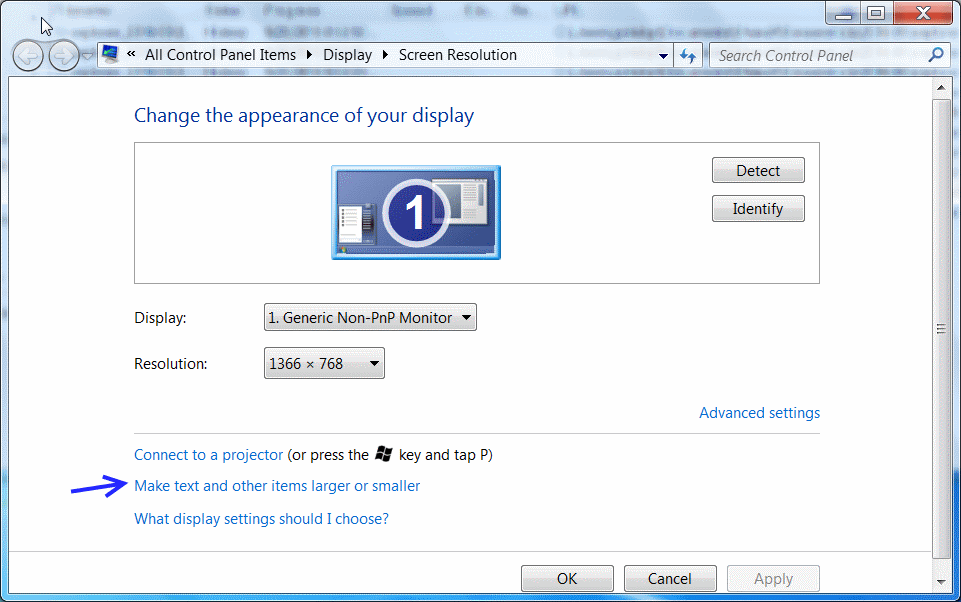
Solution #1 - Set DPI scaling to 100 percent (ie: Disabled)
One solution that pretty much always works is turning off desktop scaling all together (On newer versions of Windows, this must be done for each monitor). The downside is items on your screen may appear too small for your liking. If this is so, then the other solutions further down may suit you better. If you don't mind the smaller GUI however, then these are the steps:
- Turn off DPI scaling for each monitor (Here's how on Windows 10)
- Turn off DPI scaling for each monitor (Here's how on Windows 7)
- Click "Apply"
- Reboot your computer for the changes to fully take effect.
- NOTE: The above solution may even work for old versions of SteadyMouse such as v1.3


Solution #2 - Use DPI compatibility mode (Per-app)
If SteadyMouse loses control of the cursor only when certain programs are running, and NOT on certain monitors
altogether, then you are probably running Windows 7 or Windows Vista with a DPI scaling of 150% or greater.
What you are seeing is a bug that Microsoft has since fixed in newer versions of Windows. Next time you
upgrade Windows the bug will be gone for good, and in the mean time, thankfully, we have a workaround.
The issue shows up when you run any application that is "DPI unaware" under the hood. This means it doesn't know
about Windows DPI scaling and Microsoft's solution is to have the OS "lie" to it to make things sort-of work. When
one of these "DPI unaware" programs has focus, it unfortunately interferes with SteadyMouse control of the cursor
by feeding in wildly incorrect mouse coordinates.
- One solution is to track down every program that interferes with SteadyMouse, right click its icon, and select "properties"
- Then click the "Compatibility" tab and check the box that says "Disable display scaling on high DPI settings"
- Then click "OK"
- Now that particular program will no longer interfere with SteadyMouse. The hard part however is finding all these troublesome programs and repeating the above steps for each one.
- FYI: You can also solve this by changing the system wide DPI to something other than 150% (100% or 125% works for instance).

Solution #3 - Use experimental settings
SteadyMouse v2.0.6.0 and later has a hidden alternate mechanism of controlling the cursor that is significantly more immune to interference from DPI scaling issues. This method will work in almost all cases, however it is experimental and has much less testing than the default original mechanism. Enabling it also requires a bit of technical ability, since it requires manually editing the SteadyMouse settings file itself. The upside is that, to my knowledge as of October 2016, this method works on all versions of Windows in all DPI setting scenarios, with any monitor configuration. If you try it and find anything amiss whatsoever, please send me an email so I can investigate.
- Before proceeding study the instructions here to become familiar with how to edit the advanced settings within SteadyMouse.
- Once you have the settings.xml file open in an editor exit the SteadyMouse application.
- Back in the editor, we'll be changing two settings: "use_direct_cursor_injection" and "stream_interception_mode"
- First find "use_direct_cursor_injection" and change it from '0' to '1'
- Next find "stream_interception_mode" and change it from '0' to '1'
- Save the changes and close the file.
- Run SteadyMouse and now all should be well on any DPI scalings you wish to use.
Mouse Feels Stuttery
If the cursor feels stuttery it can sometimes be an energy saving change made to the OS starting in Windows 10 version 2004 / build 19041.
The Workaround
See the Windows timer workaround on the gaming page: Stuttery Mouse Motion. That section includes the registry command, the required reboot, and the command to undo the change.
Doesn't Filter in Some Applications
You may notice that once in a while, when a certain application is open and has the focus, SteadyMouse
stops filtering the cursor, and Icon Targeting won't find things inside that application's window.
Windows "Task Manager" is one such example. This behavior is expected and has to do with security access
permissions. SteadyMouse runs with basic user privileges, and "Task Manager" for instance, runs with elevated
privileges. Consequently, Windows is just doing its job correctly when it prevents these programs from
sharing information. You will actually see this behavior any time SteadyMouse interacts with a program that
is "Run as Administrator", or has requested UAC elevation and received it.
So what should be done about it? There are four options:
- Option #1 is to leave it as is, and understand that programs running with elevated privileges will interact in this way. For security it's best to have as few programs run with administrative rights as possible.
- Option #2 is to run SteadyMouse with administrative rights. You can do so by right clicking the SteadyMouse icon,
selecting "Properties", and then selecting the "Compatibility" tab. Then at the bottom check the box that
says "Run this program as an administrator" and click "Apply". You can also click "Change settings for all users"
if you desire the change to be system wide.

You will have to quit and restart SteadyMouse for this to take effect.
SteadyMouse will filter the cursor for everything after this, as long as you launch it with the icon you modified.
Note: If you have SteadyMouse set to start automatically with Windows, it may be necessary to perform the above change to the SteadyMouse icon found in the Start Menu's "Startup" folder (in addition to the desktop icon). - Option #3 is to try running the "uncooperative" application as a normal user rather than administrator. Unfortunately, "Task Manager" and many other programs do not work without admin rights, so this path is probably the least feasible. If a program is running as an administrator and doesn't need to be, then you could of course just disable that.
- Option #4 requires upgrading to SteadyMouse v2.1.1.0 or later. Software updates have been made to deal with the issue automatically and unobtrusively. Simply install the newer verion and you're good to go.
In any event, regardless of the route you take, the behavior is expected and nothing to be alarmed about.
RoboForm App Toolbar Annoyance
A user reported a situation where an application called RoboForm hounds the cursor with a toolbar whenever SteadyMouse is enabled! "RoboForm" is a tool for autofilling forms.
After some experimentation it seems that this program is incorrectly thinking that the "Show Normal Mouse Position" crosshair in SteadyMouse is a form that needs to be filled in. It then places its RoboForm toolbar next to the cursor trying to be helpful. This end up being highly annoying to the user. Thankfully there's an easy workaround until RoboForm fixes this: Turn off "Show Normal Mouse Position" in SteadyMouse.

Open the SteadyMouse settings window and simply uncheck the box called "Show Normal Mouse Position". The RoboForm toolbar will disappear and you should be all set after that.
Click & Drag in Windows 10
Several users reported in early 2018 that "click & drag" to highlight text or move a
scroll-bar was not working well on Windows 10. The problem began with Microsoft's Windows 10
v1709 update that automatically went out to users at the end of 2017. The bug is in the
operating system and has been reported to Microsoft by both the libSDL and Chromium teams.
You can find their discussions about it
here and
here respectively.
It is expected to be fixed in Windows 10 v1803 that will be rolling out in mid-April, 2018.
UPDATE: I have also reported this bug
here
to add more perspective.
The Workaround
SteadyMouse 2.6.3.0 and later work around this issue so it is not necessary to wait on Microsoft to fix their end. Please upgrade if you have not already. Alternatively you can use the steps below to get reasonable improvement.
First review the instructions here that discuss how to access the hidden settings in the SteadyMouse "About" window. Once you have gotten that far, simply check these two boxs labeled:
- "Use Direct Cursor Injection"
- "Use Raw Input Stream Intercept Mode"
Mouse Clicks Blocked in Windows 10
A user reported a mouse clicking issue in the new Windows version released in April, 2017 called Windows 10 Creator Update. Apparently, in certain applications clicking the mouse button fails to do anything! Most notably, in the Edge browser.
The Temporary Workaround
To fix the issue for the time being, open the SteadyMouse settings window and simply uncheck the box for "Show Normal Mouse Position".

Technical Details
After some experimentation it turns out Windows 10 Creator Update is no longer respecting a particular property that makes a window transparent to mouse clicks.
Special effects in SteadyMouse are done via transparent windows that are then drawn upon. Normally these windows are visual only, and act as if not even there as far as mouse clicks go. Unfortunately starting with the Creator Update, this is no longer the case. In particular, the transparent window used for "Show Normal Mouse Position" in SteadyMouse is receiving mouse clicks rather then letting them through to the window underneath. In other words, it is no longer truly transparent. Since it often sits underneath the mouse cursor, this becomes a significant problem.
After a bit of searching I learned this bug has already been reported to Microsoft here.
On my end, line of sight to a possible fix has been found and will hopefully be ready in the next release.
Parallels Virtual Machine - Jumpy Mouse
If you are running SteadyMouse in Windows within a Virtual Machine such as Parallels for the Mac, you may discover the cursor jumping all over the place after initial setup. This is thought to be caused by the way the the virtual machine takes over the mouse.
The Workaround
Thankfully, fixing the issue requires just a slight adjustment to the Parallels settings. Start by navigating to the menu at the top, and selecting "Virtual Machine" followed by "Configure"

Select the "Hardware" tab, then click "Mouse and Keyboard", and finally change your settings to match the picture.

Restart the VM and you should be all set.
VMWare Fusion Virtual Machine - Jumpy Mouse
If you are running SteadyMouse in Windows within a Virtual Machine such as VMWare Fusion, you may discover the cursor jumping all over the place after initial setup. This is thought to be caused by the way the the virtual machine takes over the mouse.
The Workaround
Fixing the issue should require just a slight adjustment to the VMWare Fusion mouse settings. Start by navigating to the "General" tab in the configuration. From there experiment with changing the "Gaming" mouse settings to see if the problem goes away.

If still having odd mouse behavior, try turning off all checkboxes pertaining to "Grabbing the mouse"

Restart the VM and see if all is well.
VirtualBox Virtual Machine - Jumpy Mouse
If you are running SteadyMouse in Windows within a Virtual Machine such as VirtualBox, you may discover the cursor jumping all over the place after initial setup. This is thought to be caused by the way the the virtual machine takes over the mouse.
The Workaround
Fixing the issue should require just a slight adjustment to the VirtualBox mouse settings. Find in the lower right corner of the VirtualBox window a toolbar with a mouse icon. Right click this and select Mouse Integration

After doing this, click inside the main window and you will get a pop-up relating to mouse capture. Note that you will have to press a special hotkey to transition the mouse from within the virtualization environment back to your main OS. The default hotkey used by VirtualBox is RIGHT CTRL.

SteadyMouse will work now when running within Windows on VirtualBox.
SteadyMouse Click Lock Incompatibility
If you are running SteadyMouse in Windows and have Click Lock enabled, it automatically gets disabled.
The Workaround
Presently "Click Lock" interferes with SteadyMouse, and to keep things functional SteadyMouse disables it. There may be room to solve this going forward, however I unfortunately do not have a known workaround at this time.